DIY Hardware Manual
Building Your Intelligent Residential Energy Orchestrator (IREO)
in Edmonton, Alberta
1. Introduction
1.1 What Is IREO?
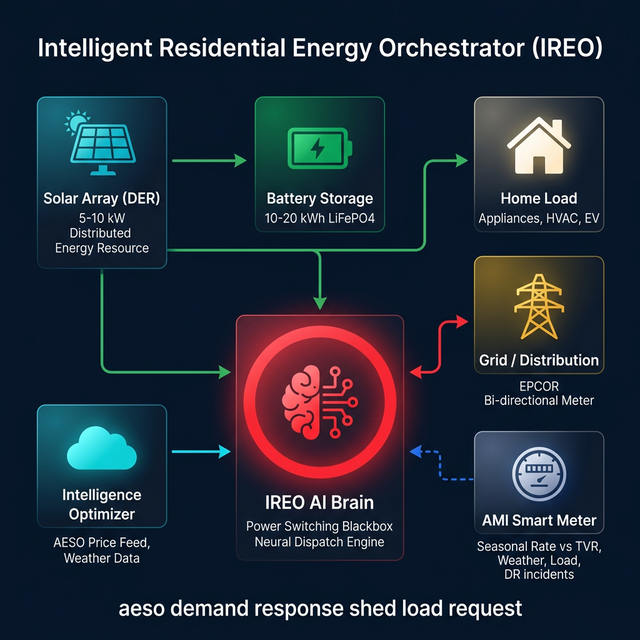
The Intelligent Residential Energy Orchestrator (IREO) is an AI-powered energy hub that controls the flow of electricity between your solar panels, battery storage, the utility grid, and your home loads. Its mission: minimize your electricity costs and maximize solar self-consumption.
IREO uses a Python-based "Neural Dispatch Brain" (brain.py) running on a Raspberry Pi to make real-time decisions — CHARGE the battery when grid prices are low, HOLD energy for later, or SELL/EXPORT when rates spike — all autonomously, 24/7.
1.2 Why Edmonton?
Edmonton and the surrounding area (including Sherwood Park) present a unique opportunity for solar energy:
- Long summer days — Edmonton receives 17+ hours of daylight in June, producing excellent solar yields from May–September.
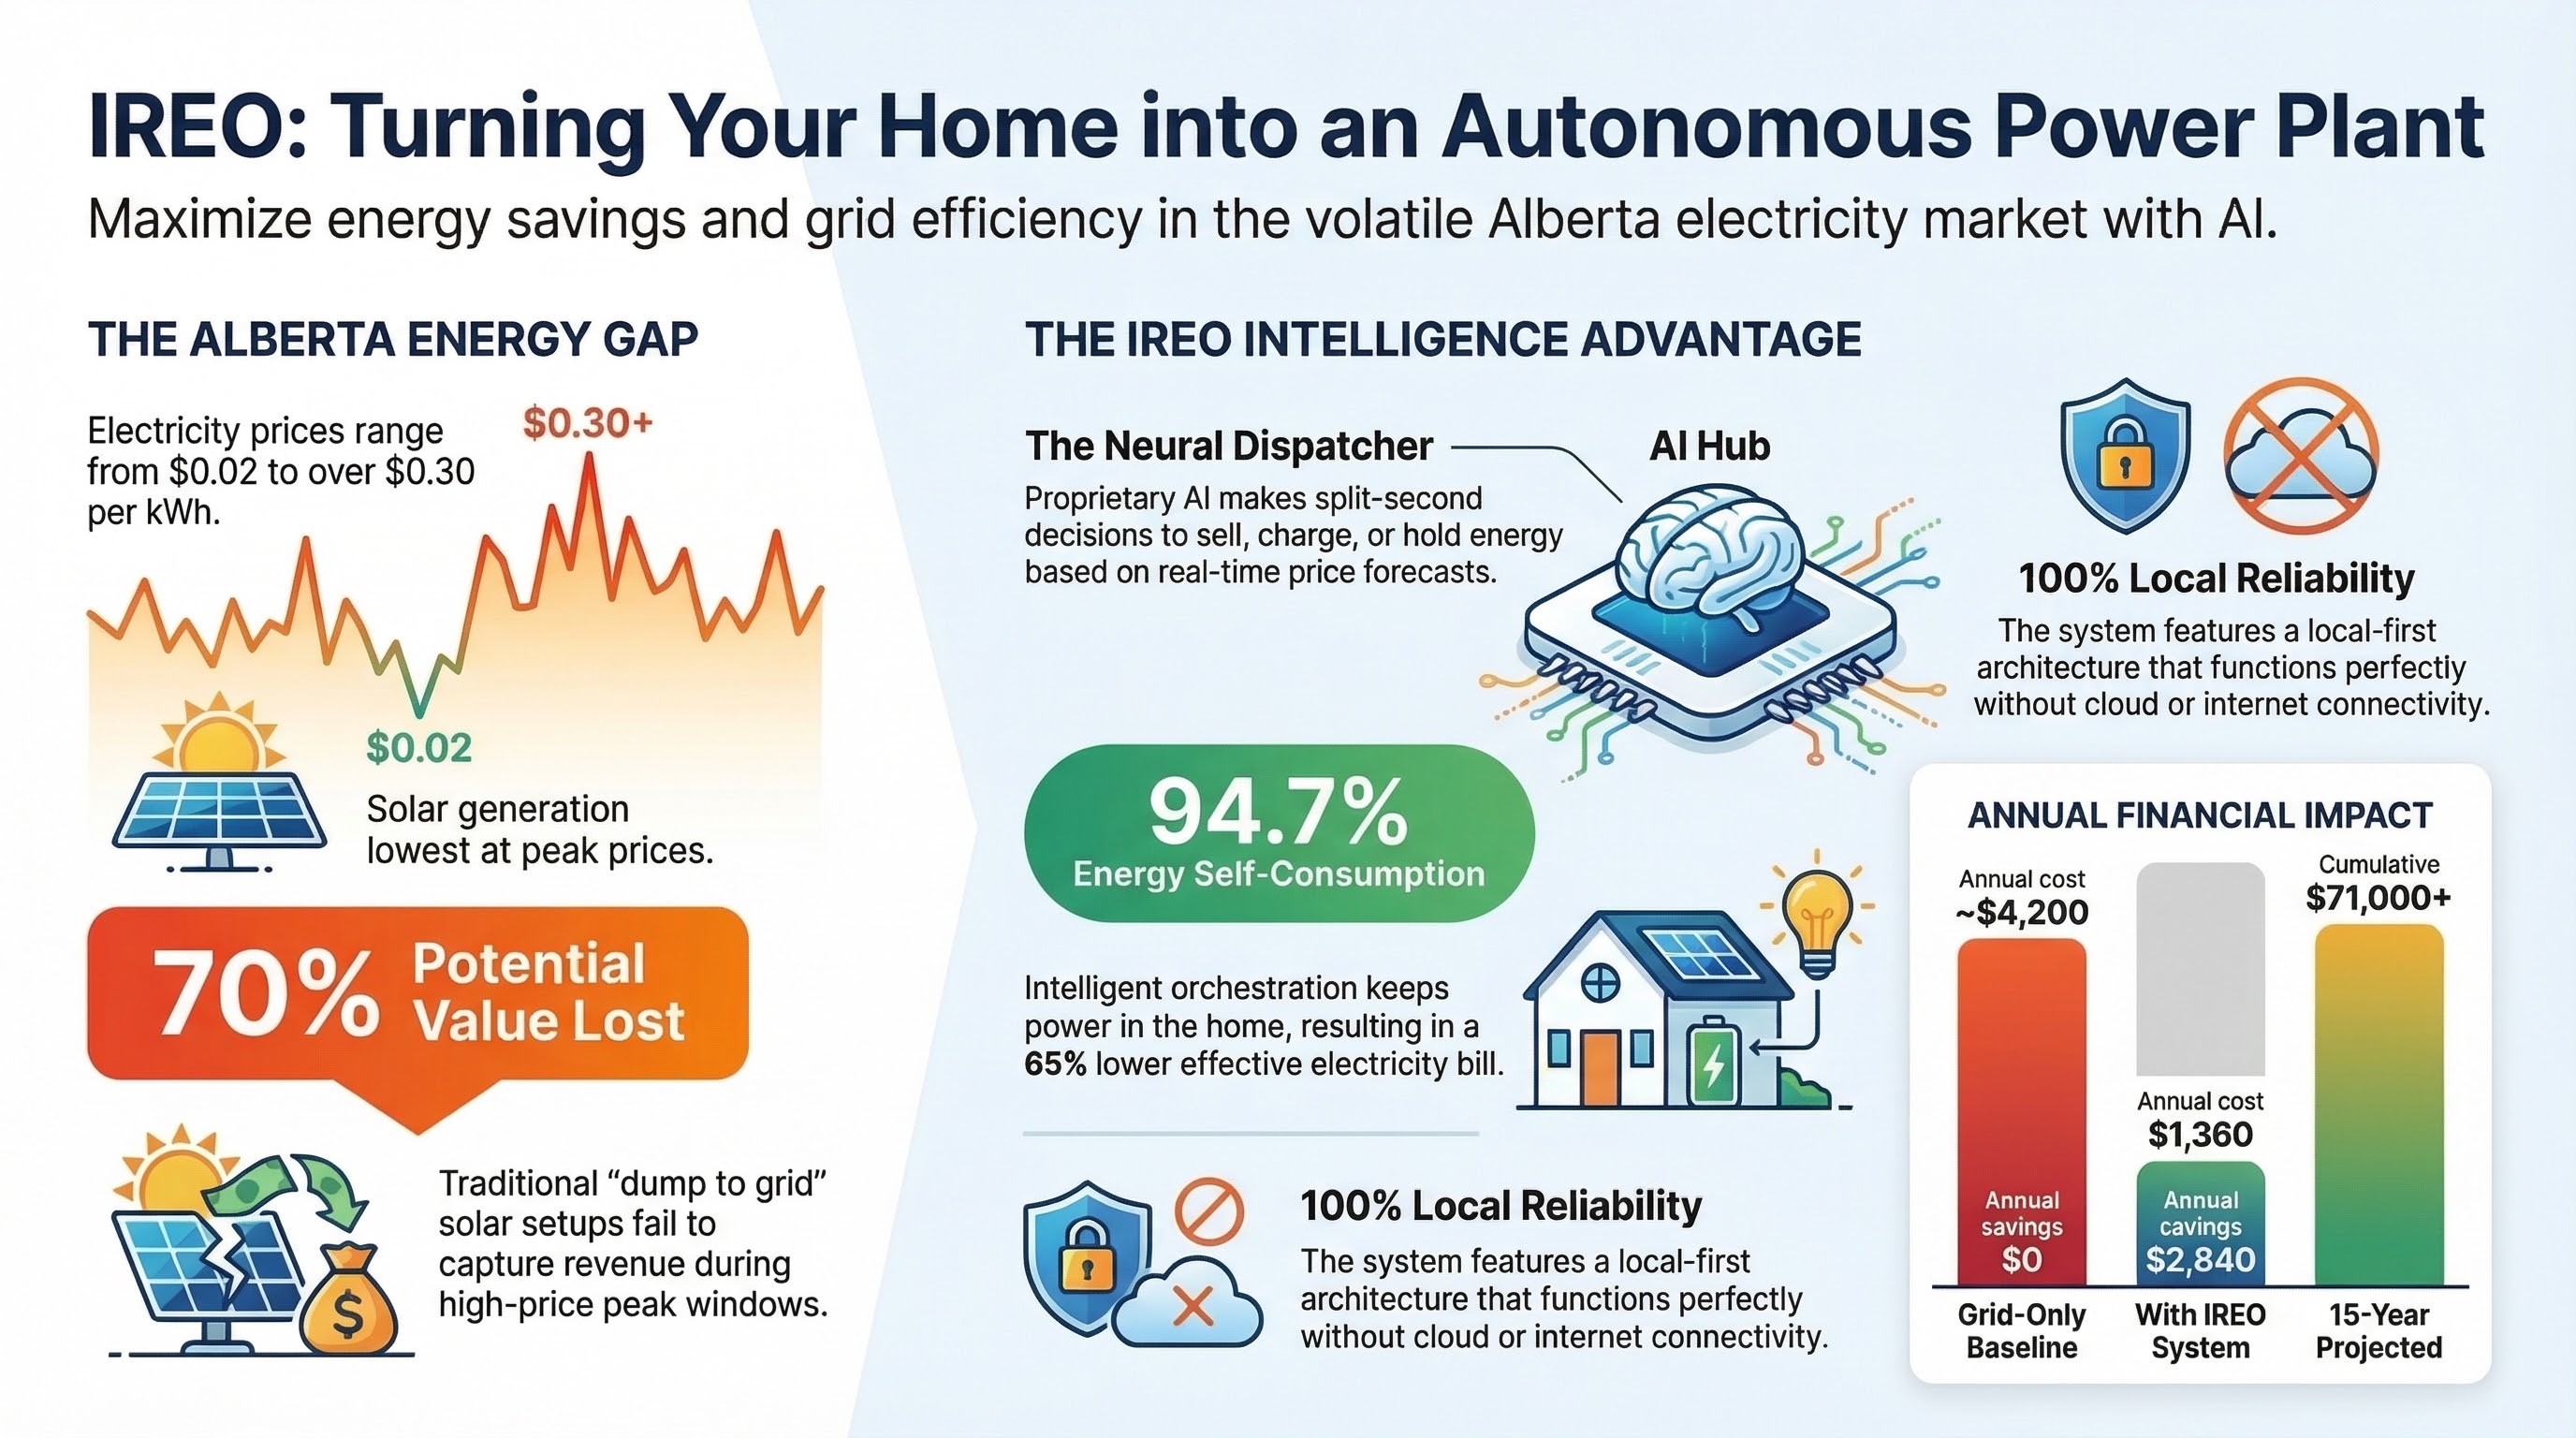
- Alberta's deregulated electricity market — Volatile real-time pool prices (via AESO) mean the AI brain can exploit price spikes by selling stored energy at premium rates, especially during winter evening peaks ($0.15–$0.22/kWh).
- Cold winters — While solar production drops November–February, the AI shifts strategy to buy cheap overnight power and sell during expensive morning/evening peaks.
- Government incentives — The Canada Greener Homes Loan offers up to $40,000 interest-free financing for solar and battery installations.
- Net metering — Alberta's Micro-generation Regulation allows systems up to 5 MW to export excess to the grid and receive credits.
1.3 Assumptions
- You are located in the Edmonton / Sherwood Park area of Alberta, Canada.
- You have basic tools (drill, screwdrivers, wrenches) and basic electronics knowledge (can solder, use a multimeter, follow wiring diagrams).
- You have a suitable south-facing roof or ground area with minimal shading.
- You understand that grid-tied electrical work requires a certified electrician — this manual guides DIY for the low-voltage AI controller and off-grid testing only.
Under the Alberta Safety Codes Act and the Canadian Electrical Code (CSA C22.1), all grid-tied solar and battery installations must be performed or supervised by a certified electrician with appropriate permits. DIY is suitable for off-grid testing, low-voltage (under 30V DC) control circuits, and AI brain assembly only. Failure to obtain permits may result in fines, voided insurance, or safety hazards. Consult Alberta Municipal Affairs before proceeding.
1.4 How This Manual Is Organized
- Safety Guidelines — Read before touching any equipment.
- System Overview — Understand how each component connects.
- Components & BOM — What to buy, where to buy it, and approximate costs.
- Incentives & Regulations — Grants, rebates, and permits in Alberta.
- Step-by-Step Assembly — 9 detailed installation steps.
- AI Brain Integration — Installing and configuring the Python script.
- Dashboard Setup — Setting up the monitoring web interface.
- Troubleshooting & FAQ — Common problems and solutions.
- Glossary — Technical terms explained.
- References — Supplier links, regulations, and further reading.
2. Safety Guidelines
Working with electricity, batteries, and rooftop installations can result in death, serious injury, fire, or property damage. Follow every precaution listed here. If you are unsure about any step, stop and consult a professional.
2.1 Electrical Hazards
- Solar panels generate DC voltage whenever exposed to light — they cannot be "turned off." A 10-panel string can produce 400V+ DC, which is lethal.
- Always assume wires are live. Use a multimeter to verify zero voltage before touching any connection.
- Work on wiring only during overcast conditions or at night for solar circuits, or cover panels with opaque tarps.
- AC circuits (grid-tied): Must be de-energized at the main breaker by a qualified person. Lock-out/tag-out procedures apply.
- Never work alone — have someone nearby who can call 911.
2.2 Battery Safety
- Lithium batteries can catch fire or explode if shorted, punctured, overcharged, or exposed to extreme temperatures.
- Use only Battery Management System (BMS)-equipped batteries from reputable manufacturers (e.g., RELiON, Pylontech).
- Install batteries in a fireproof enclosure — use metal NEMA-rated cabinets, not wood or plastic.
- Keep a Class D fire extinguisher (for lithium fires) near the battery bank. Water will NOT extinguish lithium fires.
- Maintain ambient temperature between 5°C and 35°C — lithium batteries degrade in Edmonton's -30°C winters if unheated.
- Use insulated tools only. Remove jewelry and watches when working near batteries.
- Never mix battery chemistries or capacities in the same bank.
2.3 Rooftop / Height Safety
- Use a proper fall arrest harness rated to CSA Z259.10 standards when working on roofs.
- Do not work on wet, icy, or snowy roofs — wait for dry conditions.
- Use proper scaffolding or extension ladders (rated Type 1A or better). Have a helper stabilize the ladder base.
- In Edmonton, roof work is safest May–September. Avoid winter installations unless you are experienced.
2.4 Required PPE (Personal Protective Equipment)
| Item | Purpose | Source & Price |
|---|---|---|
| Insulated electrical gloves (Class 00) | Protection from 500V DC | Home Depot Edmonton ~$45 |
| Safety goggles (CSA Z94.3) | Eye protection from arcs/sparks | Home Depot Edmonton ~$12 |
| Hard hat | Overhead hazard protection | Home Depot Edmonton ~$25 |
| Fall arrest harness | Roof work safety | Home Depot Edmonton ~$120 |
| Steel-toe boots | Foot protection | Mark's Work Wearhouse ~$100 |
| Class D fire extinguisher | Lithium battery fires | Amazon.ca ~$60 |
2.5 Alberta Codes & Permits
- Alberta Safety Codes Act — All electrical installations must meet the current Canadian Electrical Code (CSA C22.1-24).
- Electrical Permit — Required from the City of Edmonton (~$200) before starting any grid-tied electrical work.
- Inspection — A Safety Codes Officer must inspect and approve the installation before energizing.
- Micro-generation Application — Required for grid-connected solar systems under Alberta's Micro-generation Regulation (AR 27/2008).
- Only a certified master electrician may connect your system to the grid. This is non-negotiable.
2.6 Emergency Procedures
- Do NOT touch the victim if they are still in contact with the source.
- Disconnect power at the main breaker or solar DC disconnect.
- Call 911 immediately.
- Begin CPR if the person is unresponsive and not breathing.
- Evacuate the area immediately — lithium fires produce toxic fumes.
- Call 911 and report a lithium battery fire.
- If safe to do so, use a Class D fire extinguisher or large amounts of water to cool surrounding materials.
- Do NOT attempt to move burning batteries.
- Ventilate the space after the fire is out.
3. System Overview
3.1 Architecture Diagram
The IREO system consists of six major components connected in this flow:
3.2 How It Works — The AI Decision Loop
- Sense — Current and voltage sensors (ACS712/INA219) measure solar output, battery state-of-charge (SoC), grid import/export, and home consumption.
- Analyze — The
brain.pyscript monitors the AESO pool price and applies seasonal thresholds to determine optimal action. - Decide — The Neural Dispatcher makes one of four decisions every tick:
- ⚡ SELL — Grid price is high → discharge battery to grid/home
- ⬇ CHARGE — Grid price is low → charge battery from grid/solar
- ⚡ PRE-CHARGE — Price spike predicted → charge now to sell later
- ⏸ HOLD — Neutral price → maintain current state
- Act — GPIO-controlled relays route power accordingly through the inverter/charger.
- Report — The live dashboard (
dashboard.html) displays real-time metrics via a local web server.
3.3 Seasonal Strategy (Edmonton)
| Season | Months | Sell Threshold | Charge Threshold | Strategy |
|---|---|---|---|---|
| Winter | Dec–Feb | $0.15/kWh | $0.04/kWh | Buy cheap overnight power, sell during morning/evening peaks. Low solar. |
| Spring | Mar–May | $0.10/kWh | $0.03/kWh | Increasing solar. Charge from panels, sell afternoon surpluses. |
| Summer | Jun–Aug | $0.08/kWh | $0.02/kWh | Maximum solar. Self-consume most, export excess during evening peaks. |
| Fall | Sep–Nov | $0.12/kWh | $0.035/kWh | Declining solar. Transition to grid-buy strategy. Prepare for winter peaks. |
4. Components & Bill of Materials
All prices are in Canadian Dollars (CAD), estimated for 2026. Prices fluctuate with supply chain conditions. Always confirm pricing before ordering. Tax (GST 5%) is not included.
4.1 Solar Panels
| Item | Specification | Qty | Unit Price | Subtotal | Source |
|---|---|---|---|---|---|
| Canadian Solar HiKu6 CS6R-410MS | 410W Mono PERC, 20.6% efficiency | 12–20 | $300–380 | $3,600–7,600 | Solacity.com |
| Alternative: LONGi Hi-MO 5 | 545W Mono, bifacial option | 10–16 | $350–420 | $3,500–6,720 | Solacity.com |
For Edmonton's latitude (53.5°N), install panels at a 45–55° tilt angle for year-round optimization. South-facing is ideal. Use PVWatts Calculator to estimate your specific yield — expect ~1,100–1,300 kWh/kW per year.
4.2 Battery Storage
| Item | Specification | Qty | Unit Price | Subtotal | Source |
|---|---|---|---|---|---|
| Pylontech US3000C | 3.55 kWh LiFePO4, 48V, stackable, built-in BMS | 3–6 | $1,400–1,600 | $4,200–9,600 | Volts.ca |
| Alternative: RELiON RB48V100 | 48V 100Ah (5.12 kWh), cold-rated to -20°C | 2–4 | $2,800–3,200 | $5,600–12,800 | Solacity.com |
Edmonton winters regularly reach -30°C. Lithium batteries must be stored in a heated, insulated enclosure (garage with heater, basement). Charging below 0°C damages cells permanently. The Pylontech US3000C has internal heating, but the RELiON RB48V100 LT series is purpose-built for cold weather.
4.3 Inverter & Charge Controller
| Item | Specification | Price | Source |
|---|---|---|---|
| Victron MultiPlus-II 48/3000/35-32 | 48V 3kVA hybrid inverter/charger, grid-tie capable, ESS mode | $1,800–2,200 | Solacity.com |
| Alternative: Fronius Primo Gen24 7.7 | 7.68 kW, 208–240V, Made in Austria, 10-year warranty, built-in emergency power outlet (1600W from solar), battery-upgrade ready | Contact for pricing | Evolve Energy |
| Victron SmartSolar MPPT 150/100-Tr | 150V input, 100A output, Bluetooth, VE.Direct | $750–900 | Solacity.com |
| Victron Cerbo GX (recommended) | System monitoring hub, runs Venus OS, MQTT/Modbus support | $350–450 | Solacity.com |
The Fronius Primo Gen24 is an excellent alternative to the Victron MultiPlus-II. Fronius has been making inverters since 1990, has Canadian tech support and warehouse, and the Gen24 includes a built-in emergency power outlet — if the grid goes down and the sun is shining, you get up to 1600W of backup power with no battery required. Available from our partner Evolve Energy.
4.4 AI Brain & Sensors
| Item | Specification | Price | Source |
|---|---|---|---|
| Raspberry Pi 5 (4GB) | Quad-core ARM Cortex-A76, GPIO 40-pin, WiFi/BT | $75–85 | Memory Express Edmonton |
| Raspberry Pi 5 Power Supply (27W USB-C) | Official 5.1V 5A PSU | $15 | Memory Express Edmonton |
| MicroSD Card (64GB, A2) | SanDisk Extreme — fast boot | $15 | Memory Express Edmonton |
| ACS712 30A Current Sensor (×2) | Hall-effect, analog output, measures AC/DC current | $8–12 each | DigiKey.ca |
| INA219 Voltage/Current Sensor (×2) | I²C interface, 26V 3.2A max, high-side measurement | $12–18 each | DigiKey.ca |
| 4-Channel Relay Module (5V) | Optocoupler isolated, 10A 250VAC rated | $12–18 | Amazon.ca |
| DS18B20 Temperature Sensor (×2) | 1-Wire digital, waterproof probe, ±0.5°C | $8–12 each | Amazon.ca |
| Logic level converter (3.3V ↔ 5V) | Bi-directional, 4-channel | $6 | DigiKey.ca |
| Jumper wires, breadboard, headers | Assorted kit | $15–25 | Amazon.ca |
4.5 Enclosure, Wiring & Protection
| Item | Specification | Price | Source |
|---|---|---|---|
| NEMA 4X Enclosure (large) | Weatherproof, 24"×20"×10", wall-mount for inverter | $80–120 | Home Depot Edmonton |
| NEMA enclosure (small) | For Raspberry Pi + relays, 10"×8"×4" | $30–50 | Home Depot Edmonton |
| MidNite Solar MNPV6 Combiner Box | 6-string PV combiner with fuses, NEMA 3R | $180–220 | Solacity.com |
| 10 AWG PV Wire (red+black) | USE-2/RHW-2 rated, UV-resistant, 100ft roll | $80–120/roll | Solacity.com |
| 6 AWG Battery Cable | Tinned copper, flexible, with lugs | $60–90/pair | Solacity.com |
| MC4 Connectors (10 pairs) | IP67 rated solar connectors | $25–35 | Amazon.ca |
| DC Breakers (63A, 150V DC) | 2-pole DC disconnect for solar & battery | $30–45 each | Amazon.ca |
| AC Breaker Panel | Sub-panel with 30A/40A breakers | $80–120 | Home Depot Edmonton |
| Cable glands, conduit, DIN rail | Assorted hardware | $40–60 | Home Depot Edmonton |
4.6 Tools Required
| Tool | Est. Price (if buying) | Source |
|---|---|---|
| Digital Multimeter (Fluke 115 or equiv.) | $160–220 | Home Depot Edmonton |
| MC4 Crimping Tool | $35–50 | Amazon.ca |
| Wire Strippers / Cutters | $20–30 | Home Depot Edmonton |
| Cordless Drill + Bits Set | $80–150 | Home Depot Edmonton |
| Torque Wrench (for panel bolts) | $40–60 | Home Depot Edmonton |
| Soldering Iron + Solder | $30–50 | Memory Express / Amazon.ca |
| Cable Tester | $25–40 | Amazon.ca |
4.7 Total Estimated Cost Summary
| Category | Low Estimate | High Estimate |
|---|---|---|
| Solar Panels (12–20 units) | $3,600 | $7,600 |
| Battery Bank (10–20 kWh) | $4,200 | $9,600 |
| Inverter + Charge Controller + GX | $2,900 | $3,550 |
| AI Brain (Pi + Sensors + Relays) | $200 | $320 |
| Enclosures, Wiring, Protection | $600 | $900 |
| Tools & PPE | $400 | $750 |
| TOTAL (materials only) | $11,900 | $22,720 |
| Electrician / Permits (estimated) | $1,500 | $3,500 |
| GRAND TOTAL | $13,400 | $26,220 |
At ~$2,840/year in savings, a mid-range $18,000 system pays for itself in approximately 6.3 years. With the Canada Greener Homes interest-free loan, the upfront cash requirement is effectively $0.
5. Incentives & Regulations in Edmonton/Alberta
5.1 Federal Incentives
Canada Greener Homes Loan
- Amount: Up to $40,000 interest-free loan for eligible home energy retrofits including solar panels and battery storage.
- Term: 10-year repayment period.
- Eligibility: Must own the home, complete a pre- and post-retrofit EnerGuide evaluation.
- Application: NRCan — Canada Greener Homes
Canada Revenue Agency — Clean Energy Tax Credits
- Check current CRA guidelines for Clean Technology Investment Tax Credit (ITC) — up to 30% refundable tax credit for eligible clean energy investments.
5.2 Provincial (Alberta) Programs
Alberta Micro-Generation Regulation
- Allows residential systems up to 5 MW to connect to the grid and export excess energy.
- Net billing: You receive credit at the retail rate for exported kWh.
- Application through your utility retailer (e.g., EPCOR, ENMAX, Direct Energy).
Municipal Programs
- City of Edmonton: Change Homes for Climate program — check edmonton.ca for current rebates on solar installations.
- PACE financing: Some Alberta municipalities offer Property Assessed Clean Energy financing — check with your municipality.
5.3 Required Permits
| Permit | Authority | Approximate Cost | Notes |
|---|---|---|---|
| Electrical Permit | City of Edmonton (Safety Codes) | $150–250 | Required before any electrical work begins. Submit plans. |
| Building Permit | City of Edmonton | $100–200 | May be required for rooftop structural modifications. |
| Electrical Inspection | Alberta Safety Codes Officer | Included with permit | Must pass before system is energized. |
| Micro-generation Application | Your utility retailer (EPCOR) | Free–$100 | Required for grid connection and net metering. |
| Utility Interconnection | EPCOR / wire service provider | $0–500 | Bi-directional meter installation. |
5.4 Process Checklist
- Get an EnerGuide pre-retrofit evaluation (~$300–600) — required for Greener Homes Loan.
- Apply for the Canada Greener Homes Loan — get pre-approval.
- Obtain an electrical permit from the City of Edmonton.
- Hire a certified master electrician for grid-tied components.
- Complete installation and schedule a Safety Codes inspection.
- Apply for micro-generation status with your retailer.
- Get a bi-directional meter installed by EPCOR.
- Get an EnerGuide post-retrofit evaluation.
- Submit documents for loan disbursement.
6. Step-by-Step Assembly Instructions
Complete Sections 2 (Safety) and 5 (Permits) first. Have all required PPE on hand. Grid-tied wiring in Steps 4 and 8 must be performed by a certified electrician. The steps below focus on the DIY-safe portions.
Site Assessment
Before purchasing anything, evaluate your installation site:
- Roof Assessment: Confirm your roof faces south (±30°), is structurally sound, and has 40–80 m² of unshaded area. Hire a structural engineer if your roof is over 20 years old.
- Solar Yield Estimate: Use the NREL PVWatts Calculator. Enter your address, system size (e.g., 8 kW), tilt (50°), azimuth (180° for south). Edmonton typically yields 1,150–1,280 kWh/kWp/year.
- Shading Analysis: Check for trees, chimneys, or adjacent buildings that cast shadows. Even partial shading drastically reduces output. Use a Solar Pathfinder or SunEye tool if available.
- Electrical Panel: Verify your main panel has capacity for a solar breaker (typically 40A). If your panel is maxed out, you'll need an upgrade (electrician required).
- Internet Connectivity: The Raspberry Pi AI brain needs WiFi or Ethernet to fetch AESO price data. Confirm coverage at the installation location.
Install Solar Panels
Use fall arrest equipment. Work only in dry weather. Have a helper on the ground. If uncomfortable at heights, hire a solar installer for this step.
- Install racking: Use IronRidge XR series or equivalent roof-mount racking. Attach rail feet to rafters (not just sheathing) using lag bolts with flashing.
- Run conduit: Plan the wire path from roof to the electrical room. Use UV-rated conduit for outdoor runs.
- Mount panels: Slide panels onto rails and secure with mid/end clamps. Torque to manufacturer spec (typically 12–15 N·m).
- Wire strings: Connect panels in series strings (2–3 strings of 4–6 panels each, staying under the MPPT controller's 150V max input). Use MC4 connectors.
- Test: With panels still disconnected from the charge controller, measure open-circuit voltage (Voc) of each string with a multimeter. Compare to calculated values (sum of individual panel Voc × number in string).
Wire Charge Controller & Battery
- Mount the Victron SmartSolar MPPT 150/100 in your NEMA enclosure, on DIN rail or wall brackets. Ensure adequate ventilation — the controller generates heat under load.
- Connect battery first: Always connect the battery to the charge controller before connecting solar panels. Use 6 AWG cables with appropriate fuses (100A DC fuse on the battery positive).
- Connect solar strings: Run PV cables from the combiner box to the MPPT controller. Use the DC disconnect switch between panels and controller.
- Configure via Bluetooth: Use the Victron Connect app to set battery type (LiFePO4), voltage (48V), and charge parameters per battery manufacturer specs.
- Off-grid test: With batteries connected and solar input live, verify charging behavior. The MPPT should show charge current and battery voltage on the app.
Set Up Hybrid Inverter
The Victron MultiPlus-II connects to AC mains (240V). This step must be performed by a licensed electrician per Alberta Safety Codes Act.
- Mount the MultiPlus-II in the electrical enclosure with adequate clearance for airflow.
- DC connection: Connect battery bank to the inverter's DC input (48V) with appropriate cabling and fusing.
- AC connections (electrician): Wire AC-in from the main panel and AC-out to a critical loads sub-panel.
- Install Cerbo GX: Connect the Cerbo GX monitoring hub via VE.Direct and VE.Bus cables to the MPPT and MultiPlus-II. Connect to your network via Ethernet.
- Configure ESS mode: Use the Victron Remote Console to enable Energy Storage System mode, which allows the inverter to work with the AI brain for charge/discharge decisions.
Assemble the AI Brain
This is the core DIY step — assembling the Raspberry Pi controller with sensors and relays.
- Flash Raspberry Pi OS: Use Raspberry Pi Imager to flash Raspberry Pi OS Lite (64-bit) to the microSD card. Enable SSH and configure WiFi during imaging.
- Assemble in enclosure: Mount the Pi on standoffs inside the small NEMA enclosure. Route GPIO ribbon cable to a breakout board.
- Connect INA219 sensors (I²C bus):
- SDA → GPIO 2 (Pin 3)
- SCL → GPIO 3 (Pin 5)
- VCC → 3.3V (Pin 1)
- GND → Ground (Pin 6)
- Use different I²C addresses for each sensor (A0/A1 jumpers)
- Connect relay module (via logic level converter):
- IN1 → GPIO 17 (Pin 11) — Solar charge relay
- IN2 → GPIO 27 (Pin 13) — Grid export relay
- IN3 → GPIO 22 (Pin 15) — Battery discharge relay
- IN4 → GPIO 23 (Pin 16) — Aux relay
- VCC → 5V (Pin 2), GND → Ground (Pin 9)
- Connect DS18B20 temperature sensors (1-Wire):
- Data → GPIO 4 (Pin 7) with 4.7kΩ pull-up resistor to 3.3V
- One sensor on battery bank, one on inverter for thermal monitoring
Install & Configure the AI Software
See Section 7 (AI Brain Integration) for detailed software installation instructions, including Python dependencies, residential-scale brain.py configuration, and systemd service setup.
Set Up the Dashboard
See Section 8 (Dashboard Setup) for instructions on deploying the IREO monitoring dashboard on your local network.
Testing & Commissioning
Grid-tie testing must be supervised by your certified electrician. The Safety Codes inspection must pass before energizing the grid connection.
Phase 1: Off-Grid Test (DIY OK)
- Disconnect the system from the grid (AC-in disconnected).
- Verify solar charging: panels → MPPT → battery. Confirm SoC is rising in the Victron app.
- Test inverter output: Connect a test load (e.g., a lamp) to AC-out. Confirm 120/240V AC output.
- Test AI brain: Run
brain.pyand verify it reads sensor data and controls relays correctly. - Monitor temperatures: Confirm battery and inverter temps stay within safe ranges under load.
Phase 2: Grid-Tie Test (Electrician Required)
- Electrician connects AC-in and configures the grid-tie protection relay.
- Schedule and pass the Safety Codes inspection.
- EPCOR installs the bi-directional meter.
- Test grid export: Verify the AI brain correctly decides to SELL and energy flows to the grid.
- Test grid import: Verify CHARGE mode pulls energy from the grid during low-price periods.
- Run for 48 hours and review the dashboard logs for any anomalies.
Monitoring & Maintenance
Once commissioned, your IREO system requires minimal ongoing maintenance:
| Task | Frequency | Notes |
|---|---|---|
| Check dashboard for errors/warnings | Daily (automated alerts recommended) | Set up email/SMS notifications via Python script |
| Visual panel inspection | Monthly | Look for debris, cracked glass, loose wiring |
| Clean solar panels | 2–4× per year | Spring pollen, summer dust, fall leaves. Use soft brush + water. No soap. |
| Snow removal from panels | As needed (winter) | Use a soft roof rake. Never use metal tools. Snow slides off naturally at steep tilts. |
| Check battery SoC trends | Monthly | Look for capacity degradation. Expect ~80% capacity after 4,000+ cycles. |
| Firmware updates (Victron/Pi) | Quarterly | Check Victron Professional portal and sudo apt update on Pi. |
| Re-torque panel mounting bolts | Annually (spring) | Thermal cycling can loosen fasteners. |
| Professional electrical inspection | Every 3–5 years | Recommended for insurance/safety compliance. |
7. AI Brain Integration
7.1 Software Installation
SSH into your Raspberry Pi and run the following commands:
# Update system
sudo apt update && sudo apt upgrade -y

# Install Python 3.12 and dependencies
sudo apt install -y python3 python3-pip python3-venv git

# Create project directory
mkdir -p ~/ireo && cd ~/ireo

# Create virtual environment
python3 -m venv venv
source venv/bin/activate

# Install Python libraries
pip install RPi.GPIO smbus2 adafruit-circuitpython-ina219 \
    w1thermsensor requests flask numpy

# Copy your brain.py to the Pi
# (via SCP from your main computer):
# scp brain.py pi@<pi-ip>:~/ireo/
7.2 Residential-Scale Configuration
The original brain.py is configured for a 2 MW / 4 MWh commercial system. You need to scale it down for residential use. Key changes:
# In brain.py — Modify the BatteryBank class __init__:
class BatteryBank:
    def __init__(self, capacity_kwh=15.0, max_power_kw=5.0):
        self.capacity_kwh = capacity_kwh       # 15 kWh (e.g., 4× Pylontech US3000C)
        self.max_power_kw = max_power_kw       # 5 kW max discharge
        self.soc = 0.65
        self.charge_efficiency = 0.95
        self.discharge_efficiency = 0.95
        self.cycle_count = 0.0
        self.min_soc = 0.10
        self.max_soc = 0.95

# In the SolarSystem class:
class SolarSystem:
    SOLAR_CAPACITY_KW = 8.0  # 8 kW residential array (e.g., 20× 400W panels)

    def __init__(self):
        self.price_engine = AESOPriceEngine()
        self.battery = BatteryBank(capacity_kwh=15.0, max_power_kw=5.0)
        self.seasonal = SeasonalCalculator()
        self.dispatcher = NeuralDispatcher(
            self.battery, self.price_engine, self.seasonal
        )
        self.revenue = RevenueTracker()
        self.tick_count = 0

    # ... also update HOLD passive charge threshold:
    # Change: if solar_kw > 100 → if solar_kw > 0.5
# (original threshold was for MW-scale)The stock brain.py uses simulated data. To connect real sensors, add GPIO-reading code that replaces the simulated solar_output_kw() and price engine with actual INA219 sensor readings and AESO API calls.
7.3 GPIO Control for Relays
Add this helper class to brain.py for controlling the relay module:
import RPi.GPIO as GPIO

class RelayController:
    """Controls 4-channel relay via GPIO."""
    PINS = {
        'solar_charge': 17,   # GPIO 17 — Pin 11
        'grid_export':  27,   # GPIO 27 — Pin 13
        'bat_discharge': 22,  # GPIO 22 — Pin 15
        'aux':          23,   # GPIO 23 — Pin 16
    }

    def __init__(self):
        GPIO.setmode(GPIO.BCM)
        for pin in self.PINS.values():
            GPIO.setup(pin, GPIO.OUT, initial=GPIO.HIGH)  # HIGH = relay OFF (active-low)

    def activate(self, relay_name):
        GPIO.output(self.PINS[relay_name], GPIO.LOW)

    def deactivate(self, relay_name):
        GPIO.output(self.PINS[relay_name], GPIO.HIGH)

    def execute_decision(self, decision):
        """Map AI decision to relay states."""
        # Reset all relays
        for pin in self.PINS.values():
            GPIO.output(pin, GPIO.HIGH)

        if decision == 'SELL':
            self.activate('bat_discharge')
            self.activate('grid_export')
        elif decision in ('CHARGE', 'PRE-CHARGE'):
            self.activate('solar_charge')
        # HOLD = all relays off

    def cleanup(self):
        GPIO.cleanup()
7.4 Connecting to Victron via Modbus TCP
If you have a Victron Cerbo GX, you can read real battery/solar data via Modbus TCP instead of using analog sensors:
from pymodbus.client import ModbusTcpClient

class VictronReader:
    """Read live data from Victron Cerbo GX via Modbus TCP."""
    def __init__(self, host='192.168.1.100', port=502):
        self.client = ModbusTcpClient(host, port=port)

    def read_battery_soc(self):
        result = self.client.read_holding_registers(266, 1, unit=100)
        return result.registers[0] / 10.0  # Returns SoC as percentage

    def read_solar_power(self):
        result = self.client.read_holding_registers(789, 1, unit=100)
        return result.registers[0]  # Returns watts

    def read_grid_power(self):
        result = self.client.read_holding_registers(820, 1, unit=100)
        return result.registers[0]  # Positive = importing, Negative = exporting
7.5 Running as a System Service
Create a systemd service so brain.py starts automatically on boot:
# Create the service file
sudo nano /etc/systemd/system/ireo-brain.service
[Unit]
Description=IREO Neural Dispatch Brain
After=network.target
[Service]
Type=simple
User=pi
WorkingDirectory=/home/pi/ireo
ExecStart=/home/pi/ireo/venv/bin/python3 /home/pi/ireo/brain.py
Restart=always
RestartSec=10
StandardOutput=journal
StandardError=journal
[Install]
WantedBy=multi-user.target# Enable and start the service
sudo systemctl daemon-reload
sudo systemctl enable ireo-brain.service
sudo systemctl start ireo-brain.service
# Check status
sudo systemctl status ireo-brain.service
# View logs
journalctl -u ireo-brain.service -f8. Dashboard Setup
8.1 Overview
The IREO dashboard (dashboard.html) provides a real-time web interface showing solar output, battery SoC, grid rates, AI decisions, and revenue tracking. It can be served from the Raspberry Pi on your local network.
8.2 Install a Web Server
# Install lightweight web server
sudo apt install -y nginx

# Copy dashboard files to web root
sudo cp ~/ireo/dashboard.html /var/www/html/
sudo cp ~/ireo/ireo-logo.png /var/www/html/

# Restart nginx
sudo systemctl restart nginx
Access the dashboard at http://<pi-ip-address>/dashboard.html from any device on your network.
8.3 Connect Dashboard to Live Data
To feed real-time data from brain.py to the dashboard, add a Flask API endpoint:
from flask import Flask, jsonify
import threading

app = Flask(__name__)
system = None  # Reference to the running SolarSystem instance

@app.route('/api/status')
def get_status():
    """API endpoint for dashboard to fetch live data."""
    return jsonify({
        'solar_kw': round(system.solar_output_kw(), 2),
        'battery_soc': round(system.battery.soc_pct, 1),
        'battery_kwh': round(system.battery.soc_kwh, 1),
        'price_mwh': round(system.price_engine.current_price_mwh, 2),
        'price_kwh': round(system.price_engine.price_kwh, 5),
        'decision': system.dispatcher.last_decision,
        'revenue': round(system.revenue.total_revenue_cad, 2),
        'kwh_sold': round(system.revenue.kwh_sold, 1),
        'season': system.price_engine.get_season(),
        'cycles': round(system.battery.cycle_count, 2),
    })

# Start Flask in a background thread
def start_api(sys_ref):
    global system
    system = sys_ref
    threading.Thread(
        target=lambda: app.run(host='0.0.0.0', port=5000),
        daemon=True
    ).start()
Then modify the dashboard JavaScript to fetch from this API every 2 seconds instead of using simulated data.
8.4 Remote Access (Optional)
To access your dashboard outside your home network, use a Tailscale VPN (free for personal use) or Cloudflare Tunnel. Avoid exposing your Pi directly to the internet.
9. Troubleshooting & FAQ
9.1 Common Issues
| Problem | Likely Cause | Solution |
|---|---|---|
| Low solar output in winter | Short days, snow cover, low sun angle | Normal for Edmonton. The AI shifts to grid-buy strategy automatically. Clear snow from panels with a soft roof rake when safe to do so. |
| Battery not charging below 0°C | BMS cold-protection lockout | Ensure battery enclosure is heated. Pylontech US3000C has internal heating; verify it's enabled. Keep ambient above 5°C. |
| Raspberry Pi not booting | Corrupted SD card, power supply issue | Re-flash the SD card. Use the official 27W USB-C PSU. Check for under-voltage lightning bolt icon on boot. |
| Relay not switching | Logic level mismatch, GPIO misconfiguration | Verify 3.3V→5V level converter is connected. Check GPIO pin assignments in brain.py. Test relay with a simple Python script. |
| Dashboard not loading | Nginx not running, wrong IP | Run sudo systemctl status nginx. Check Pi's IP with hostname -I. Verify firewall allows port 80. |
| AESO price data not updating | Internet connectivity, API changes | Check Pi's internet: ping google.ca. Verify AESO API endpoint is still valid. The stock script uses simulated prices — implement the real AESO API if needed. |
| Inverter showing error codes | Varies — overload, temperature, grid fault | Check the Victron Remote Console for specific error codes. Consult the Victron MultiPlus-II manual. |
| Grid export not registering | Bi-directional meter not installed, micro-gen not approved | Contact EPCOR to verify meter type. Ensure micro-generation application is approved and meter is bi-directional. |
| High battery cycle count | Aggressive charge/sell cycles | Adjust thresholds in SeasonalCalculator to widen the HOLD band. LiFePO4 batteries handle 4,000+ cycles to 80% capacity. |
9.2 Frequently Asked Questions
Q: Can I install this entire system myself?
A: Not entirely. The low-voltage AI brain, sensor wiring, and off-grid battery testing are DIY-friendly. However, all grid-connected electrical work (solar panel wiring to the grid, inverter AC connections, and meter installation) must be done by a certified electrician in Alberta. This is a legal requirement under the Alberta Safety Codes Act.
Q: How much will I actually save per year?
A: The $2,840/year figure assumes a well-sized system (8 kW solar, 15 kWh battery) with 94.7% self-consumption in Edmonton. Actual savings depend on your electricity consumption, rate plan, solar exposure, and how aggressively the AI trades price spreads. Conservative estimate: $1,500–3,500/year.
Q: Does solar work in Edmonton's winter?
A: Yes, but output drops significantly. December–January production may be only 15–25% of summer output due to short days and low sun angle. The AI compensates by switching to a grid-arbitrage strategy (buy low overnight, use during peaks). Snow reflection (albedo effect) can actually boost output on clear winter days.
Q: What happens during a power outage?
A: With the Victron MultiPlus-II, your system can operate in off-grid mode, powering critical loads from the battery and solar. The switchover is automatic (within 20ms). However, current Alberta regulations require anti-islanding protection — consult your electrician about configuring this safely.
Q: How long do the batteries last?
A: Pylontech US3000C batteries are rated for 6,000 cycles to 80% depth of discharge (DoD). At one cycle per day, that's over 16 years. With the AI optimizing cycles, expect even longer life. Manufacturer warranty is typically 10 years.
Q: Can I expand the system later?
A: Yes. Both the Pylontech battery stack (up to 16 units) and the solar array can be expanded. You may need an additional MPPT controller for more panels. Any expansion to the grid-tied components requires a new permit and electrician visit.
Q: Is this system insurable?
A: Most home insurance policies cover properly permitted and inspected solar installations. Inform your insurer before installation. Unpermitted work may void your coverage. Get the Safety Codes inspection certificate and keep it on file.
10. Glossary
| Term | Definition |
|---|---|
| AESO | Alberta Electric System Operator — manages Alberta's wholesale electricity market and sets pool prices. |
| BMS | Battery Management System — electronic circuitry that monitors and protects battery cells from overcharge, over-discharge, and overheating. |
| DC (Direct Current) | Type of electrical current produced by solar panels and batteries. Flows in one direction. |
| AC (Alternating Current) | Type of electrical current used in homes and the grid. Oscillates direction 60 times per second (60 Hz in Canada). |
| DoD | Depth of Discharge — how much of the battery's capacity has been used. 80% DoD means 20% charge remains. |
| ESS | Energy Storage System — Victron's operating mode that enables smart charging/discharging based on grid conditions. |
| GPIO | General Purpose Input/Output — the digital pins on the Raspberry Pi used to connect sensors and relays. |
| I²C | Inter-Integrated Circuit — a communication protocol used by sensors like the INA219 to talk to the Raspberry Pi. |
| Inverter | A device that converts DC power (from batteries/solar) to AC power (for home use/grid export). |
| kWh | Kilowatt-hour — unit of energy. A 100W bulb running for 10 hours uses 1 kWh. |
| kWp | Kilowatt-peak — rated output of solar panels under standard test conditions (STC). |
| LiFePO4 | Lithium Iron Phosphate — a safe, long-lasting lithium battery chemistry ideal for stationary storage. |
| MC4 | Multi-Contact 4mm — standard waterproof electrical connector used in solar panel wiring. |
| Micro-generation | Alberta regulatory category for small-scale electricity generation (under 5 MW) that connects to the grid. |
| Modbus | Industrial communication protocol used by the Victron Cerbo GX to share data with external systems. |
| MPPT | Maximum Power Point Tracking — a charge controller algorithm that optimizes the voltage/current from solar panels for maximum energy harvest. |
| MWh | Megawatt-hour — 1,000 kWh. AESO pool prices are quoted in $/MWh. |
| NEMA | National Electrical Manufacturers Association — ratings for enclosure weather-resistance (e.g., NEMA 4X = weatherproof). |
| Net Metering | A billing arrangement where excess solar energy exported to the grid generates credits on your electricity bill. |
| SoC | State of Charge — the current charge level of a battery, expressed as a percentage (0–100%). |
| String | A series-connected group of solar panels. Multiple strings may be connected in parallel. |
| TOU | Time of Use — electricity pricing that varies by time of day (on-peak, off-peak). |
| Voc | Open-Circuit Voltage — the maximum voltage a solar panel produces when not connected to a load. |
| VE.Direct / VE.Bus | Victron Energy proprietary communication interfaces for connecting their devices together. |
11. References & Resources
11.1 Suppliers (Canada / Edmonton)
| Supplier | What They Sell | Website |
|---|---|---|
| Solacity | Solar panels, inverters, charge controllers, batteries, wiring — full system packages | solacity.com |
| Volts.ca | Pylontech batteries, Victron equipment, solar accessories | volts.ca |
| Memory Express (Edmonton) | Raspberry Pi, microSD cards, electronics, computer components | memoryexpress.com |
| DigiKey Canada | Sensors (ACS712, INA219), electronic components, connectors | digikey.ca |
| Home Depot (Edmonton) | Enclosures, conduit, tools, PPE, general hardware | homedepot.ca |
| Amazon.ca | Relays, MC4 connectors, cable, miscellaneous electronics | amazon.ca |
| MidNite Solar | Combiner boxes, disconnects, surge protection | midnitesolar.com |
| Evolve Energy 🤝 Partner | Fronius inverters, DIY solar kits, grid-tied packages, battery storage — 16+ years experience, Canadian company | evolveenergy.ca |
11.2 Regulations & Standards
- Alberta Safety Codes Act: alberta.ca/safety-codes-act
- Canadian Electrical Code (CSA C22.1): csagroup.org
- Alberta Micro-generation Regulation (AR 27/2008): alberta.ca/micro-generation
- City of Edmonton Electrical Permits: edmonton.ca/business/permits
- EPCOR Interconnection: epcor.com
11.3 Government Incentives
- Canada Greener Homes Loan: nrcan.gc.ca
- Clean Technology Investment Tax Credit: canada.ca
- City of Edmonton — Change Homes for Climate: edmonton.ca
11.4 Equipment Manuals
- Victron MultiPlus-II Manual: victronenergy.com
- Victron SmartSolar MPPT Manual: victronenergy.com
- Pylontech US3000C Datasheet: pylontech.com.cn
- Raspberry Pi 5 Documentation: raspberrypi.com
- Canadian Solar HiKu6 Datasheet: canadiansolar.com
11.5 Tools & Calculators
- PVWatts Calculator (NREL): pvwatts.nrel.gov — Estimate solar production for your specific location.
- AESO Real-Time Pool Price: ets.aeso.ca — Live Alberta wholesale electricity prices.
- Victron VRM Portal: vrm.victronenergy.com — Free cloud monitoring for Victron systems.